Those who have vaped for a long time may have grown tired of having to regularly spend money on e-liquid (or e-juice) to refill their vape pens. Some may even have ideas for never-before-tried flavors. If this is you, it may be the time you learned the fine art of making your own e-liquid.
Mixing your own e-juice can be fun or frustrating, depending on how much knowledge you have. Whether this is your first time, or you’ve previously tried but failed, this ABCD simple, step-by-step guide on how to make vape juice will serve as a reference to help you traverse the world of DIY e-liquid, make it fun, and might even save some cash in the process.
You need to make sure you have the proper ingredients and tools for mixing. While the chemistry involved is basic and doesn’t involve blowing anything up, you still need to practice proper safety.
Also, since mixing your own DIY juice will involve terms that might be lost to new users; you can refer to ‘The Best Vaping Glossary and Terminology’ as a reference.
It’s Easier Than You Might Think
It’s okay when you wonder how to make vape juice and envision an Einstein-like old scientist (who has seen better days), in a shady laboratory, mixing some volatile chemicals, surrounded by truckloads of outlandish lab apparatuses, with a loud sound of something boiling in the background.
But that’s far from reality because making e-juice is simple, however, the result can range from a fluid you instantly want to throw down the drain to the best tasting e-juice ever, or anything in between.
Depending on the desired quantity, you can get to know how to make e-juice anywhere, in your kitchen or garage, but you’ll need some specific ingredients and equipment. Almost everything we mention in this guide is easily available online as well as in stores.
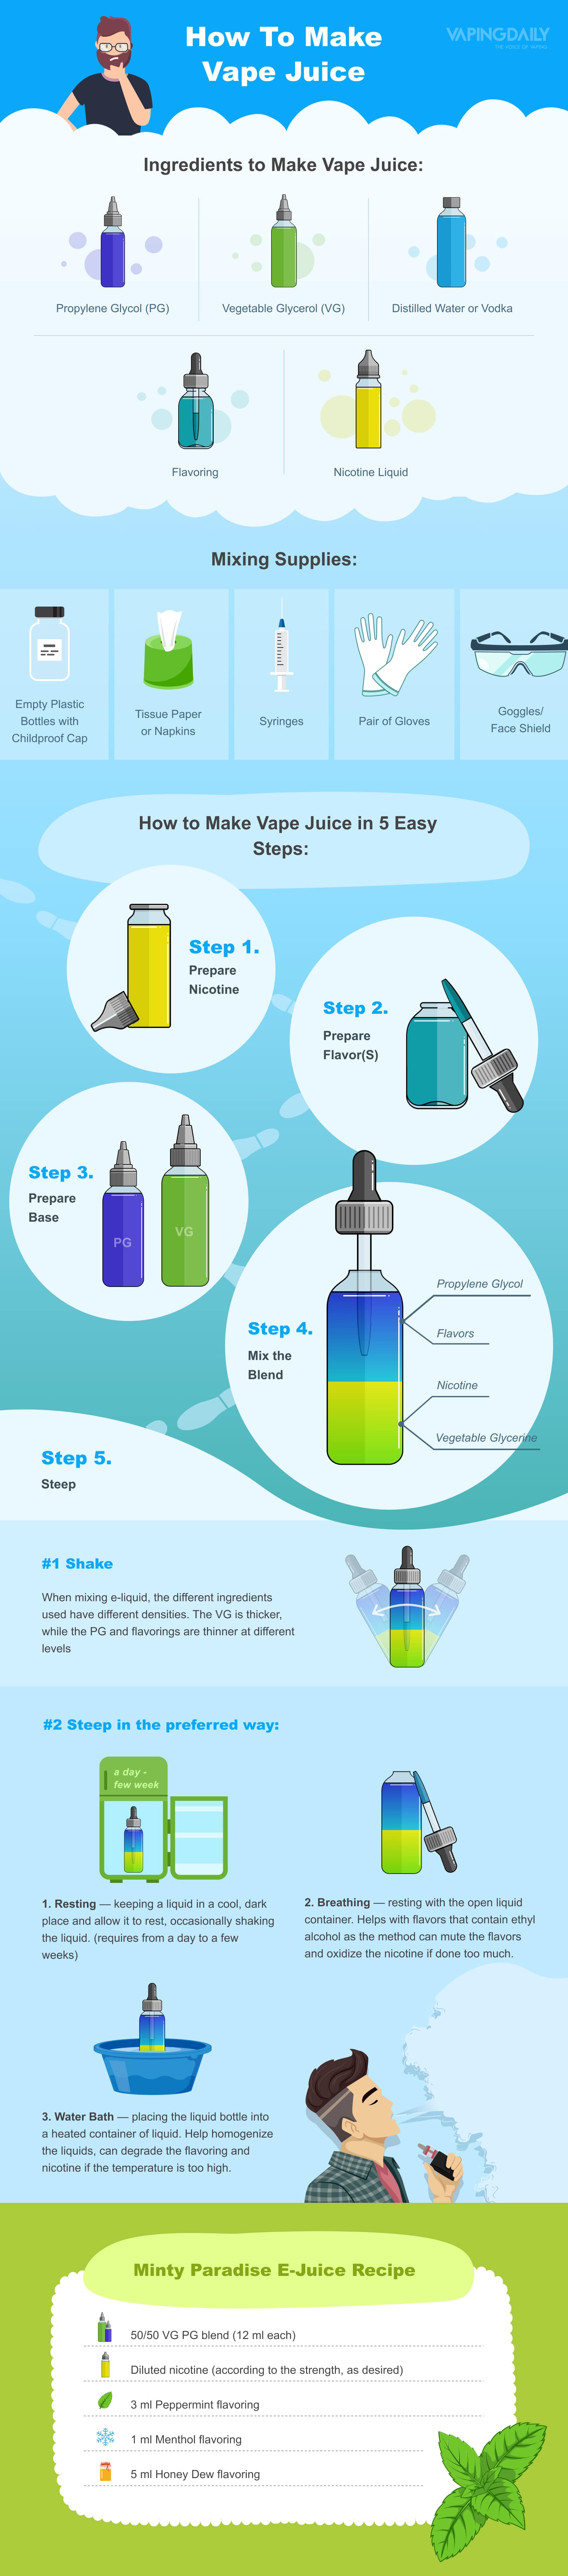
There are five ingredients to make e-liquid namely VG, PG, flavor, diluted nicotine, and distilled water or vodka, though you may or may not use nicotine and vodka. At a bare minimum, e-juice can be made with just a PG/VG base and flavoring.
I. Propylene Glycol (PG)
It’s the preferred base liquid of most DIY e juice makers, however, some may have allergies to PG. It’s a federally approved, colorless, odorless organic chemical compound used in a variety of products including tobacco, foods, and more. It’s also used in some medicinal products which can be inhaled, injected into the bloodstream, used orally or topically.
II. Vegetable Glycerol (VG)
Similar to PG but a natural liquid extract derived from vegetables, VG is more viscous (thicker) and has a slight tinge of sweetness to it. While PG doesn’t really impact the overall flavor but VG can, either in a good or bad way. It’s an FDA approved product used in foods, e-juices and even cosmetics. Most DIY e-juices use both PG and VG, as each brings unique characteristics to the e-liquid. We’ll discuss how to make vape juice with them and how they actually impact the end product in a later section.
III. Distilled Water or Vodka
While not really crucial to the mix, this is generally used to thin out 100% VG mixes. Vodka gives added throat hit, as well, without having to add nicotine. If you don’t want to use vodka, consider adding distilled water instead.
IV. Flavoring
Flavors are available in a wide variety, but for better tasting e-liquid we recommend using flavors made particularly for inhaling instead of using the commonly used food flavorings. While the usual mix requires about 10-20% flavoring, some are strong enough to require only 5%. Therefore, when using a certain flavor, make sure you read the labels and understand how it will impact your mix.
V. Nicotine Liquid
You will use diluted nicotine liquid that can be in PG or VG-base, available in various strengths. For beginners trying out how to make vape juice, you can choose any nicotine strength between 8 to 24mg and then experiment with it to find your sweet spot. If you want an apples-to-apples comparison with nicotine found in tobacco cigarettes, consider the following table:
Be extremely careful when handling nicotine liquid and do not ingest it. This can lead to a nicotine overdose. Children are very receptive to the effects of nicotine and can easily get sick or worse if they accidentally ingest it. Even a small amount can be deadly for a child. A 5mg dose killed this 15-month-old, for example.
| Nicotine Level in Traditional Tobacco Cigarette | Nicotine Level for E-Liquid (Milligrams) |
|
Nicotine-free |
0 |
|
Ultra-light |
8 |
|
Light |
11 |
|
Regular |
16 |
|
Strong |
24 |
|
Unfiltered |
36 |
I. Empty Plastic Bottles with Childproof Cap
As a beginner, using plastic bottle is your best bet. You don’t want to use big containers or expensive bottles, which are a bigger investment. Also, you want to use clean equipment every single time or you risk ruining your juice’s flavor with the residue from your previous experiments.
A fresh cheap bottle is a lot more cost effective and effective than an expensive, hard to clean container.
II. Syringes
For accurate measurements, get a separate syringe for each type of ingredient, mark the syringes and always use them for the same ingredient. Syringes can also come in handy if you’re using bottles with small openings. While counting drops also works, but when you’re working with small quantities, even a tiny difference can have a big impact on the overall e-juice. Remember, the volume of each drop depends on so many factors that there will always be some variation no matter how hard you try.
III. Tissue Paper or Napkins
The tissue paper is to wipe off any excess liquid that might spill. Even the best of us spills, so it’s better to be prepared, especially when learning how to make vape juice.
IV. Pair of Gloves
Since you’ll be dealing with nicotine, it’s ideal to use gloves. Upon contact with skin, it can be absorbed by your body which can be hazardous or can cause a skin rash.
Hiding behind the stereotype of a minor deal spilled e-liquid can be very toxic, but nicotine is very easily absorbed through the skin.
Use good quality, powder-free, rubber gloves to avoid contamination of your e-liquid.
Step 1. Prepare Nicotine
Here you’ll need some math skills to figure out the volume of nicotine required for the e-liquid to achieve the desired percentage. Since you’ll have diluted nicotine, use its strength in milligrams and the overall volume of the e-juice to calculate the required amount of nicotine. You can also use an online calculator or smartphone app to make life easy.
Adding too much nicotine can be a mess up so add a little less than the amount recommended by your e-juice calculator or the e-juice recipe, then add to the mix according to taste after steeping. If the nicotine level is enough for you, but you still want more throat hit, adding a few drops of vodka will help. It doesn’t take much; about one to five percent will be good enough.
Step 2. Prepare Flavor(S)
This is where your skills and luck come in, especially if you want to make a new flavor. Also, this step can make or break the e-juice, and deserves your maximum consideration. You can either use one flavor or mix several different flavors. However, for beginners, we recommend starting with just one or two flavors and then go from there.
Trial and error is the only approach to making e liquids, but as a rule of thumb, add a little less flavor than what the e-juice calculator or the recipe recommends. It’s better to start with less flavor than to ruin the entire batch by adding too much. After steeping, do a taste test and add flavoring according to taste. Unless you’re sure what you’re doing, never add more flavoring agent than 10% of the total volume of the end product.
Also, artificial flavors are extremely complicated and can behave differently when used with other flavors or chemicals. For instance, if you added a recommended amount of flavor to your e-liquid but don’t feel anything, adding too much flavoring will usually not help, or might even backfire by washing out the flavor. When you’re mixing flavorings, it becomes even more complicated, as the final flavor can be totally different from what you expected.
Step 3. Prepare Base
You can choose any VG/PG blend depending on your recipe, but usually, it’s between 50/50 and 80/20. Just remember that diluted nicotine usually contains some levels of PG or VG, so don’t forget to take that volume into consideration.
Step 4. Mix the Blend
When you’ve everything ready, mix it in a bottle and shake it, and I mean shake the heck out of it as most e-juices (especially high VG e-juices) are very thick, and need some shaking to properly mix the ingredients.
Step 5. Steep
To steep it or not, is a personal preference Most e-juices will taste much better when steeped, just like good, aged wine. You can try out your freshly made e-liquid after you’ve experimented with how to make vape juice. If it tastes really good and is up to your expectations, you might want to skip this step. Basically nothing but oxidation of the components of your juice, steeping is a process in which you leave the ready-to-vape e-juice sit for a while in a cool, dark place. There is no predefined period as how long the juice should be steeped, but it can take a few days or even several months. Again the denser components will finally settle down at the bottom, so you’ll need to shake them every once in a while.
Ideally, you should leave the cap off and let oxygen play its trick and make the highly volatile fluids, such as alcohol, vaporize into the air. Some people sporadically put the bottles in warm water, which can actually speed up the steeping process. Another technique involves using a coffee mug warmer or a slow cooker, which can steep the fluids in days instead of weeks. However, in this case, you’ll need to frequently check the water level.
After steeping, not only flavor but also the color of the juice will change because of nicotine getting oxidized. Instead of a colorless or light pale-ish color, you might see a more alluring, yellowish or even light brown color. In fact, a change in color is a sign of your juice being properly steeped. When it comes to steeping there is nothing absolute. For better steeping, you need two things: patience and experimentation. The process is long and monotonous, but the outcome is worth the wait.
Source: vapingdaily.com/what-is-vaping/how-to-make-vape-juice/
Tag: pure glycerin rite aid usp tincture 99 anhydrous safe danger pen lungs bp based buy coconut cbd side equate free humco homemade non sanofi temp thc wilton walmart beauty 360 cvs weed my normal smoke does contain work substitute all africare ok shops